
Serial Monitor

 Overview

I've started to learn C# to make mobile apps with Xamarin forms for controlling some of my electronics projects. To familiarize myself with the syntax and idiosyncrasies of C# I decided to make a basic serial monitor desktop app using Windows Forms. I basically modelled it of the serial monitor included in the Arduino ide, and tried to add small improvements where possible.

Code

Main steps

  • Layout the GUI
  • Establish serial reading
  • Establish serial writing
  • Improve UX

GUI Layout

In the past I've made small GUI programs with python and tkinter, so using the Windows Forms design editor was a welcome change. It was very easy to get a basic interface up and running without having to delve too deeply into the code. It was very much a case of dragging and dropping the relevant parts onto the window in the designer and attaching callback function to the relevant events.

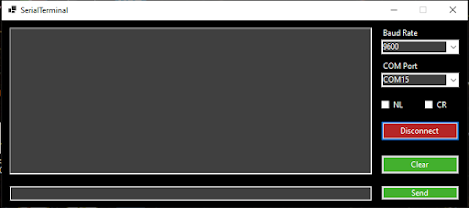
Serial communication

The C#  serial port library is pretty simple and easy to use. All it needs is a COM port to connect to and a valid baud rate as can be seen in the example below.
SerialPort _serialPort = new SerialPort();
List<string> comPorts = new List<string>();
_serialPort.PortName = "COM6";
_serialPort.BaudRate = "9600";
_serialPort.Open();
view raw serial_basic.cs hosted with ❤ by GitHub


Here is a simplified example of the serial reading and writing functions. The full functions can be found in the project linked at the bottom of the page.
private void SerialDataReceived(object sender, EventArgs e)
{
if(IsConnected)
{
string lineReceived = _serialPort.ReadLine();
ReceivedTextBoxWrite(lineReceived);
}
}
private void SendMessage()
{
string msg = sendTextBox.Text;
_serialPort.Write(msg);
sendTextBox.Clear();
}

Sending and receiving was tested with an Arduino running a program that echoes any message it receives back to the terminal.
void setup()
{
Serial.begin(9600);
}
void loop()
{
String str;
while(Serial.available() > 0)
{
str = Serial.readString();
}
if(str.length() > 0)
{
Serial.println(str);
}
}
view raw serial_echo.ino hosted with ❤ by GitHub
 

Improvements

The textbox, and button for message sending were disabled and greyed out when the serial port is not connected. The list of connected devices is also refreshed each time the COM port combo box is clicked. I also added an implementation for keeping track of the previously send messages, which can be scrolled through with the up and down keys. This was done simply by pushing them to a stack when they are sent, and then pushing them to another stack when the up key is pressed to enable scrolling up and down through them.


Popular posts from this blog

4 Channel Audio Switcher Update

Update I've been trying to move away from using the arduino environment and work at the bare metal level for avr mcus. As an experiment I decided to rewrite the code for the audio switcher I wrote about here:   https://inverseaudio.blogspot.com/2020/01/4-channel-audio-switcher.html . Its only a small amount of code so I didn't really expect much difference in terms of code, but it seemed like a good starting exercise. The code compiled within the arduino environment used 1014 bytes (49%) of the program memory, and 15 bytes (11%) of the dynamic memory. I was incredibly surprised to find that the version written in pure c, compiled with atmel studio used only 220 btyes (2.7%) of the program memory, and 2 bytes (0.4%) of the dynamic memory. The only major changes made to the code were the omission of the enum classes, the gpio pin setup, and the setting of the multiplexer pins. In such a small project the space savings weren't entirely necessary. However, I think...

4 Channel Audio Switcher

Overview The purpose of this project was as a test to see if the 4051 mux would be usable in audio switching. I've been designing a programmable guitar pedal switcher and used this as a test project to see if there were any fatal issues with using them for this purpose. I also had some attiny85s around and hadn't found a project for them. Being able to use two pins to control the select lines of 3 muxes was a perfect use case. In a future iteration I'll try the 4052 mux, the only reason I didn't use one this time is because I didn't have any, and I have heaps of 4051s lying around. Bill of Materials Attiny85 3 x 4051 Multiplexers 2 x Momentary buttons 4 x Leds 5 x Stereo sockets 1 x 7805 Voltage regulator 2 x 10uF electrolytic capacitors 3 x 1k resistors Code The code for this is pretty basic, and self explanatory, with the attiny only using 2 inputs and 2 outputs. Each of the buttons either increments or decrements the current channel. Since ...

Ableton transport control

Overview The goal of this project for me is to learn more about midi protocol, and venture into ableton live remote midi scripts. This is a basic transport controller for ableton live, but it can be used for any DAW if you manually map the controls to the CC numbers sent by the arduino. The downside of using the arduino nano is that it uses a usb to serial chip to be able to program the atmega328p. As a result of this it requires the use of a serial to midi bridge to be able to communicate with midi devices. I used Hairless MIDI < - > Serial bridge to do this, which can be found here  https://projectgus.github.io/hairless-midiserial/ . If using windows you will also need some sort of virtual midi port to be able to route the midi messages to ableton, the one I use can be found here  http://www.tobias-erichsen.de/software/loopmidi.html . I only use windows so I'm not sure what needs to be done for mac or linux. The next version I work on will use atmega328u4 wh...